Installation Instructions
Falcon Sails Install Instructions (PDF) | Stay Line Grid Template for Mast Placement (PDF)
Our installation instructions are currently being written. They will be available soon. Currently, we help our customers install their sails over the phone and by email.
Below are some pictures that should help.

Falcon Sails LLC
Thank you for buying a sail from Falcon Sails LLC.
We work hard to ensure that our design, materials, and workmanship are the best available in order to create sail kits that are amazing. We take pride in making sure that our customers receive high quality products & excellent service.
We appreciate learning about the experiences that people have with Falcon Sails, which is why we are very happy to receive pictures, videos, & trip reports from our customers. We want to know the positives and negatives. We also welcome your suggestions and ideas, in order to improve what we are doing.
Last but not least, make sure you stay safe. Staying within your limitations is key in regards to staying upright as well as maintaining ones safety. But still, like common sense tells you, you can be pushed over. Make sure you are prepared for exiting your boat, and getting back in the boat. Experiment on land and then move to calm water very close to shore before, you venture into more challenging situations. Where ever you paddle, make sure you are prepared to recover from any upsets that you could have. Learn what your limitations are, and do not exceed them. If you have any questions let us know and we will try to help you sort this out.
Happy Paddle Sailing!
Falcon Sails LLC www.falconsails.com info@falconsails.com
419-800-0132


Deciding where to locate the mast.
The first step in installing a sail rig is deciding where to put the mast. After you decide the location of your mast, everything else falls pretty much into place. There are pros and cons to any location you choose. No location is horrible or perfect or better in all ways than other reasonable locations. If you follow the general guidelines blow and give it a few minutes of thought you will be happy with your decision. Do not over think it. It is rare for somebody to feel they are unhappy with their mast location choice.
On occasion people decide they think the instructions below are not good and then move their mast far back to put it in the center of the boat to follow a more conventional sail plan. After helping over 1,000 people rig every kind of boat you can think of, we know this is a bad idea. Kayak hulls interact with the water much differently than a conventional sail boat hull does.
To get started, assemble the mast, sail, and boom. Then you can use it to size up some the options.
The general goals in mast placement, in order of importance are below.
#1 have a solid standing geometry so your rig always stays straight up and down.
This is the most important goal and easy to achieve.
#2 Keep the mast, and boom within reach when down for easy folding and securing of the rig.
#3 Allow for the most freedom of paddle strokes as possible. Typically there is some compromise here. It is very rare to have 100% free paddle strokes with any kayak sail location. For most paddle sailors this is a minor issue. If you have 100% paddle stroke freedom, the sail is likely too far away from you.
#4 Keep the mast toward the front of the boat. This is about all you need to know but in case you are wondering why, here are some basic reasons for this. Your goal is to match the center of lateral wind force above the water line with the center of lateral resistance below the water line to prevent the kayak from having a tendency of turning into the wind or down wind. At first glance putting the mast near the front of the boat goes against conventional sail thinking but you must account for the fact that a kayaks center of lateral resistance is forward of the middle of the kayak, and moves forward as speeds and forces of the sail increase.
On a shorter boat (generally 13 feet and under) the mast should be roughly 16 inches from the bow. The mast being 16 inches from the bow allows for the forestay line to be at an angle that allows for easy to achieve strong standing rig geometry. You can go less than 16 inches from the bow, but this will require more precise tuning of the standing lines. It is perfectly reasonable to go a little less than 16 inches if necessary to keep it away from a deck obstruction. It is also reasonable to go less than 16 inches just to keep the mast and boom in convenient locations. In general 10 inches is the minimum you want to go. If you have a wide boat, a solid boat, or you will not go out in big winds, or you are the kind of person that likes to adjust lines precisely, this shorter length is perfectly reasonable. Instructions for adjusting the lines are included as part of the instructions later on. One experienced Falcon Sail owner reported installing the mast 6 inches from the bow and that it worked fine for his paddle sail outings. He rigged a block and tackle system to multiply the force generated when he pulled on the forestay line which could be necessary when pushing the limits like he did.
On a long boat, you can take advantage of the length and keep the rig away from the paddler. But still keep it close enough where the paddler can reach the mast and boom when the sail is down. That way you can easily fold and secure the sail when not in use. In addition to the goal of having paddle stroke freedom, you want to keep the mast at least 16 inches away from the bow tip for easy to set up, strong standing line geometry.
The key measurement on a long boat, is the distance from the seat back band to the center of the mast deck plate. That will determine how free your stroke is and how easily the mast and boom can be reached when it is in the lowered position. Here are some rough guideline measurements for longer boats.
18 foot boat – 82 to 89 inches from the seat back band to the center of the mast deck plate.
17 foot boat – 78 to 85 inches from the seat back band to the center of the mast deck plate.
16 foot boat – 74 to 81 inches from the seat back band to the center of the mast deck plate.
15 foot boat – 70 to 78 inches from the seat back band to the center of the mast deck plate.
14 foot boat – 66 to 75 inches from the seat back band to the center of the mast deck plate.
If you are taller and or your main goal is freedom of paddle strokes try to go with the larger distance. Usually only people that consider themselves to be “serious kayakers” care a lot about this.
Another goal is to not go too far with this distance. For example, a paddler 5foot 8inches tall of typical proportions will find a distance beyond 85 inches from the seat back band, to be further away than necessary for complete paddle stroke freedom. Additionally anything further than 85 inches will start to become out of the convenient reach for this paddler. So for this paddler anything more than 85 inches may be counterproductive.
No matter where you put the sail there are pros and cons. If your primary concern is getting from point a to point b as fast as possible, a slight compromise in your paddle stroke is made up for by a factor of 4x or more with the propulsion provided for by the sail. More importantly, you will have more fun than ever once you get into paddle sailing.
A very important step in making the mast placement decision, is to experiment with how the sail will lay down on your deck when it is in the down position. The boom should be easy to reach when the sail is up, and ideally be out of the way of paddle strokes. Ideally the mast will be out of the way of your paddle strokes and be as out of the way as possible when the rig is stowed. Take into consideration that you can remove the top section of the mast when the sail is down for a more compact folding of the sail. That is discussed in the sail tie down kit instructions.
If it is possible, avoid installing the mast on a hatch cover. In the unlikely event the provided guidelines puts the mast on top of a hatch, make adjustments so the mast is not on top of a hatch cover. If this cannot be avoided, make sure your hatch is very secure and will not come off or move as the mast pushes on it. If your kayak is one that appears installing the mast on the hatch is the best option, use a lashing kit to make double sure your hatch cover is extra secure. When your sail rig is being packed at our shop we will provide a deck lashing kit if it appears the best location to install the mast is on a hatch. It is rare that installing a mast on the hatch is the best option. If there is no lashing kit with your sail kit, it means our experience indicates installing the sail on some other surface that is more solid is a better choice.
If the deck of your boat is not flat, where you want to mount the sail, use the provided deck adapter block.
If you need more help or want more detailed opinions on locating the mast read on.
Like is written above, the mast should be 16” or more away from the bow. More important than the distance of the mast from the bow is the actual distance of the mast from the tie down point of the forestay pulley. This is because the forestay pulley location determines the angle not the actual blow tip. The forestay pulley should be tied down as close the bow as can easily be done. Keeping the mast 16 inches or more away from the forestay pulley will keep the forestay line at an angle that will make it easy to have a strong standing mast. Tying the forestay pulley as close as possible to the boat will provide stronger standing geometry than if you do not tie it close to the boat. It is also good for preventing the bow pulley from being banged up as it flops around in the wind while it is on top of your car. It should not be tied loosely to your boat. All excess line should be cut off and the ends melted.
There are exceptions to all the guidelines written here including the 16 inch guideline. If it just does not work, you can easily use a smaller distance. If your boat happens to be wide ( like most sit on top and recreational kayaks ) , and or particularly stiff (like a wood boat typically is) then it is more reasonable put the mast close to the bow / forestay pulley if that is what you would like to do.
Your mast can still be very solid with less than 16 inches to the bow pulley, but there is less tolerance for other nonideal set up factors. By non –ideal set up factors we mean things like a very narrow boat, or very flexible boat, or poorly adjusted standing lines. In any case you can make it work. If your mast does not stand as solidly as you would like make sure to follow the instructions for adjusting of the back and side stay lines. This can make a huge difference.
On a longer boat, (in the 16 plus foot range) you want to place the mast so you can have a minimal impact on your paddle strokes. Ideally you can paddle normally most of the time, and on a small percentage of your strokes accidently touch the boom with your paddle. If you never touch the boom during your paddle strokes it is too far forward. If you can get away with it, you do not want the sail rig to be in the way of your paddle strokes, but still you want it to be close enough to you, so you can easily grab the mast and boom to tie it down. If it is 100% never in the way of your paddle strokes, it may be too far away to easily control and may be forward of your average center of lateral resistance.
You can cut your boom so it is 2.25 inches shorter and then use the short boom configuration. Sometimes a boom that is 2.25 inches shorter will make a difference in paddle stroke freedom. See instructions for optional short boom configuration.
The least important mast location factor is balancing the lateral wind force above the water line with the center of lateral resistance below the water line. The issue of balancing forces above and below the water line is an extensive issue, almost always miss interpreted when thought about in relation to kayak sailing, and too extensive to go into detail here. Both the center of lateral wind force, and center of lateral resistance below the water line move fore and aft with speed, weight distribution, sail trim, skeg use, leaning, and other factors. Your goal should be to put the mast where the average center of lateral wind force is close to the center of lateral resistance below the water line. If you are anywhere in the ball park that is fine. If you follow these guidelines you will be fairly close to being in balance. You will never be perfectly balanced, and you can adjust the location of both these factors by changing your weight distribution, sail trim, and leaning. If your boat has a skeg or rudder you can also use these to change your center of lateral resistance. You can learn more about this issue on our frequently asked questions where we talk about mounting the sail at the front of your boat.
Adjusting back & side stay lines
General notes about adjusting your side and back stays.
#1 – As the knots in the standing lines tighten, the lines will effectively become longer. Until they are tight your lines may need some adjustment occasionally. Once they are tight, your lines will stay in place for many years of paddle sailing.
The best thing to do, is work on tightening the knots early on. A good way to do this is wait until you have the mast mostly rigged and then pull on the mast as you hold your boat in place. This is a good way to determine how solid your rig is anyway. An even more effective way to tighten the knots is to squeeze all the standing lines together and or pull the middle of the lines in all directions. Do not worry about pushing too hard or throwing your rig out of alignment. It is best to do this earlier and on land rather than have the force of wind do it in the middle of a kayak sailing experience.
#2 – In the end you want your mast centered as best you can make it, and leaning back just enough that you can notice it as you look at your boat from the side. Perfection is not critical during your initial set up. You will learn quickly what is noticeable when you are on the water. The mast being centered is always desirable. The mast leaning back is not as important as its desirability may be outweighed by your goal of keeping the boom out of your paddle stroke area on a shorter boat. If the mast leans forward it will have an impact on your ability to sail up wind. As you are learning to sail, it is a minor issue.
#3 – The side stays and back stays should be adjusted independently. That means as you adjust the back stays to their proper length, the side stays should not be connected to the boat. As you adjust the side stays to their proper length, the back stays should not be connected to the boat. It is easier and more accurate if you adjust the side stays and back stays independently. That way you are working without other lines that complicate the task.
#4 – Every time you adjust a line, you should pull on it hard to get the knots close to their long term tightness.
Always assume your knots may tighten more. Knots getting tighter effectively make your lines just a little longer.
#5 – Once you have the standing lines adjusted even close to its final their final position, cut off the excess line and melt the ends with a lighter or a hot knife. The excess lines only add complication, bulk, weight, and look sloppy. You will never need more line than you are currently using and will only need less as the knots tighten to their final tightness and in effect make your lines longer. It’s best to leave about 1 inch of line at the ends of the standing line knots. If you are in fear of cutting the lines too short (it will never happen), have no fear as, Falcon Sails we will be happy to give you some replacement side and back stay lines if you need them.
#6 – It is best to adjust the side stay lines when the sail is not on the mast. Experienced installers will only work with the mast as they are adjusting things. They will leave the sail and boom off the rig as they adjust the stay lines. The sail will get in the way of this process. It is best to simply tie the forestay line to the junction ring or anything on the mast to temporarily hold it up, rather than running it thru its final routing. If the sail is on, and you are doing a minor adjustment, typically it is easier to just leave the sail on the mast.
Instructions for adjusting the back stay and side stays lines.
1st install the mast deck plate. Follow the instructions on where to place the mast. Once you have determined the location of the mast, install the stay pad eyes using the stay line angle template as a guide.
Then install your forestay pulley and forestay cleat, so you have something to conveniently hold the mast up as you adjust the lines.
Back stay instructions
The back stay lines should be adjusted to length before the side stays are adjusted to length. Sometimes you can skip installing the side stays. On some installs the back stays alone can keep the mast solidly standing without the side stays help. If this is the case on your boat you can skip installing the side stays. Though casual pulling on the mast to see if it is strong enough is not a good way to determine if the mast will stand well with just back stays. You should pull very hard on the mast before you come to any conclusions.
The back stays should be adjusted so it keeps the mast on the center line of the boat, and leaning back just enough so it is perceptible as you look at your boat from the side.
Adjust the back stay lines to length. Then set (in the forestay cleat which should be installed first) the forestay line hard, and start pulling on all the lines and the mast in all directions. If you pull on the middle of the lines that is very effective and powerful in tightening the knots to their final tightness.
After you pull on the lines you will likely see your mast location has changed. So adjust the lines again. Better yet, when you first adjust your lines, make it so the mast is leaning back further than what you want it to be in the end. Its lean will move forward as you tighten the lines anyway.
Once you feel the mast is on the center line of the boat, in a good leaning position fore and aft, and the knots are tight go to the back of the boat and make sure the mast is in the center line of the boat. Having no sail on the mast at this point makes it easier to perceive a lean one way or the other. An eyeball measurement is fine. Later you may notice an inconsequential right or left lean as you are paddle sailing. If that happens you can bring a line in or out a hair on your next beach landing.
If you want to be super accurate in the shop put a level (a longer one is handy here) on your boat at the cockpit, and make sure the boat is level. Then put a level (a small one is handy here) on the mast and make sure the mast is straight up and down when the boat is level. If you see it’s not straight up and down, adjust again.
After you have the back stays adjusted to your satisfaction, it’s time to consider if you need side stays.
Many times a mast can stay standing without side stays. This is not unusual with wood boat since they are so solid. Boats that are wide many times do fine without side stays. Narrow plastic boats almost always need side stays as they are softer, and the geometry of a narrow boat is less effective than a wide boat for a solid mast.
Side stay instructions.
Not having side stays can be ideal, as you have less rigging at the launch site, & 2 less lines to deal with all around. And you will not have to drill holes in your deck (or hull) to attach the side stays to the boat.
The best way to determine if side stays are necessary is to secure your boat, then raise the mast and secure it using the forestay and back stays. Then pull hard on your mast. In this case you should pull really hard, as you want the force you use to determine this to clearly exceed the wind force you will subject your rig to on the water. You do not want to find out side stays are necessary as you have ventured out into a level of wind that requires side stays on your boat. When you lean as you are paddle sailing, it can create a lot of force and so can the wind, so do not be shy when you are giving it a stress test.
If you determine your boat does not need side stays, remove the side stay lines from the junction ring and save them in case you need them later. If you go this route, watch your rig closely as you are paddle sailing and venturing into more wind as your skills increase. If the mast is leaning more than just a little bit, you need side says installed to prevent the mast from coming down as you venture out into more windy conditions.
If you feel you need side stays, start the adjustment process by detaching the back stays from your boat. (Like is written above, you should adjust the side and back stays independently) Then adjust the side stays so they become tight as you raise the mast, and keep the mast on the center line of the boat. The side stays should have no impact on the forward and back alignment of the mast. Side stays only function is to keep the mast on the center line of the boat.
To make the side stays most effective, adjust them so they become really tight as you raise the mast. The levering action of raising the mast with the side stays tight is very effective in making them extremely tight. Be very careful because if you go too tight this way, it will excessively pull on the side stays and the hardware you have mounted on your boat. It will also generate a lot of down force on the deck, and will be transferred to the hull via the mast compression strut, so you have to be careful in not applying too much force. If you see any signs of stress in the stay attachment points or in your hull, make sure the boat has not been damaged or has become unsafe.
Pull on the lines again, to help the knots settle into their final tightness just like mentioned above in the back stay instructions.
If you think the side stays are well adjusted, check to make sure the side stays (independent of the back stays) keep the mast in the centerline of the boat. You can eye ball this or use the level on the boat and on the mast technique (talked about on the back stay instructions above).
When the back stays and side stays are adjusted, put the mast up by pulling the forestay line hard and set it in its cleat. Then check to make sure you like the alignment. If it is all done well, you can pluck both back stays, and they will have the same tone, and pluck both side stays and they will have the same tone. The side stays will have a different tone than the back stays. When you are done you can say your rig is tuned to perfection.
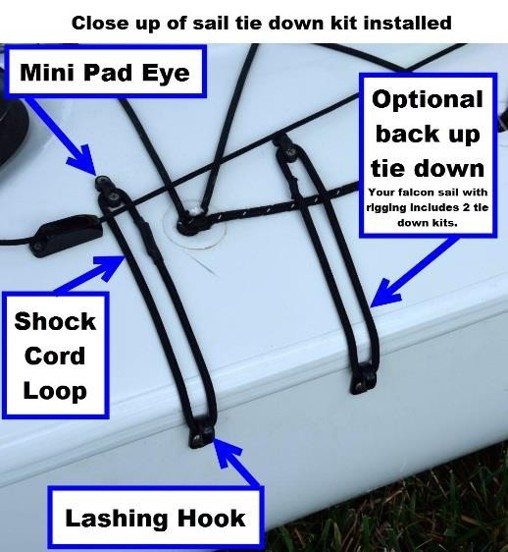
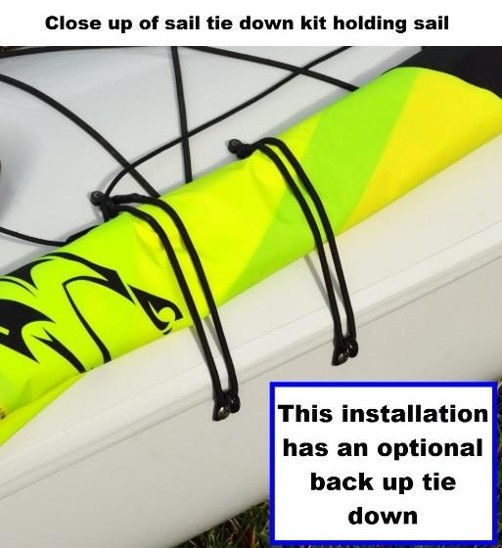
Sail tie down hardware instructions.
Installing a sail tie down is the last step in installing a sail on your boat. Sail tie downs are for securing the sail when the sail is in a down position. The fast tie down position is most commonly used. It is where you simply lower the sail and secure it. Setting up a compact stowage position is also an option. Your Falcon Sail rig includes 2 sail tie down kits. Only 1 tie down kit is required to complete your installation; however, you may like to use one for a compact tie down position, or as a backup for your fast tie down position.
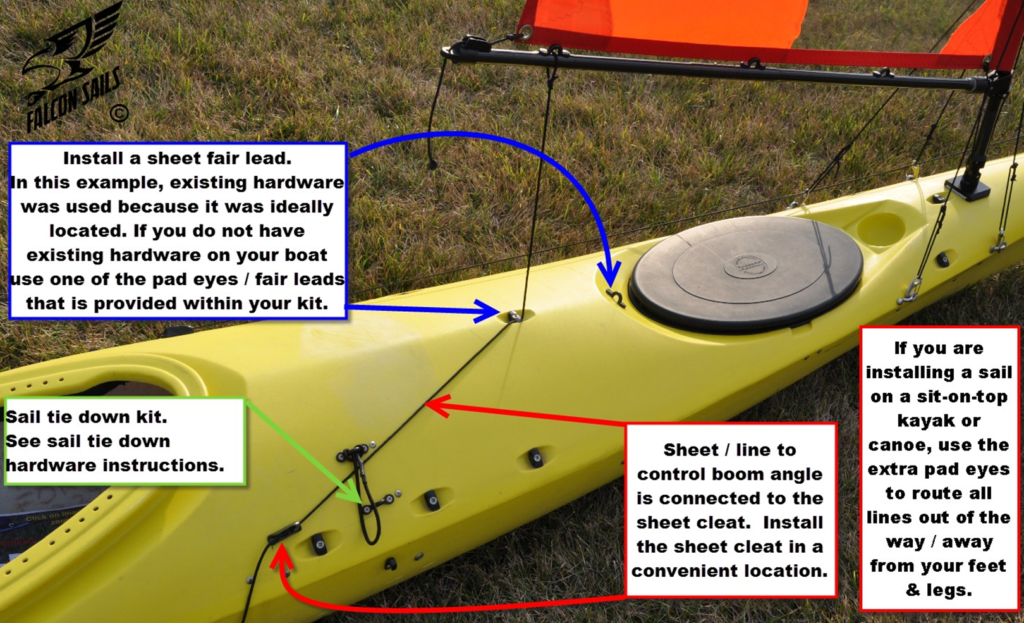
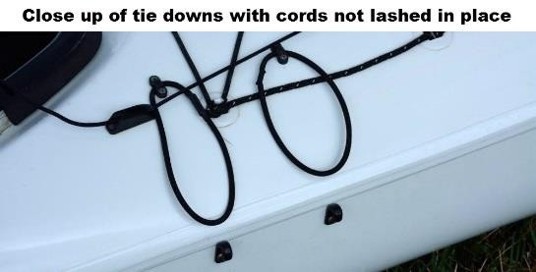
The fast tie down position is the most common arrangement. It is used to tie the sail down & get it out of the way as fast as possible. Most paddle sailors only set up this stowage position. (See pictures of some examples below.) The tie down kit should be installed in a location that holds the sail in the position, which makes paddling your boat as easy as possible. It is beneficial if the tie down is forward of where the boom end lays so it holds the boom nicely. Most often the mini pad eye will be installed on the deck and the lashing hook will be positioned on the side of the boat. It is typically done this way because when the sail is down, it’s most convenient position usually puts the mast just over the side of the deck or close to the side of the deck. This layout also makes sure that the lashing hook holds the shock cord most reliably. Make sure you can conveniently reach the shock cord from your seat. See the following pictures for some examples.

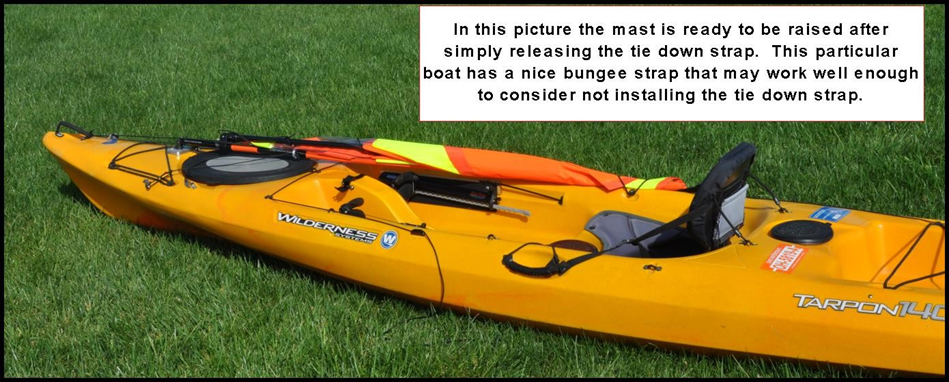
before installing a tie down kit, is to see if your boat already has lines or bungee cords that will be helpful in securing the sail when it is down. Many times boats will have existing shock cords that are convenient for securing the sail. If you plan on using a shock cord that is already on your boat, make sure it will hold the sail securely so it stays in place as necessary.
Most Falcon Sail owners do not use the compact-tie-down position; however, there are some exceptions for when it may be a good thing to do. Sometimes on shorter boats the compact-tie-down position is convenient to use when knowing it may be some time before the sail is once again raised. With compact stowage the top section of the mast is pulled out so that the mast is shorter. Following, the sail is then folded around the mast and boom. (This is shown in the following picture.) Sometimes, with a larger sail, it makes sense to take the boom apart also.
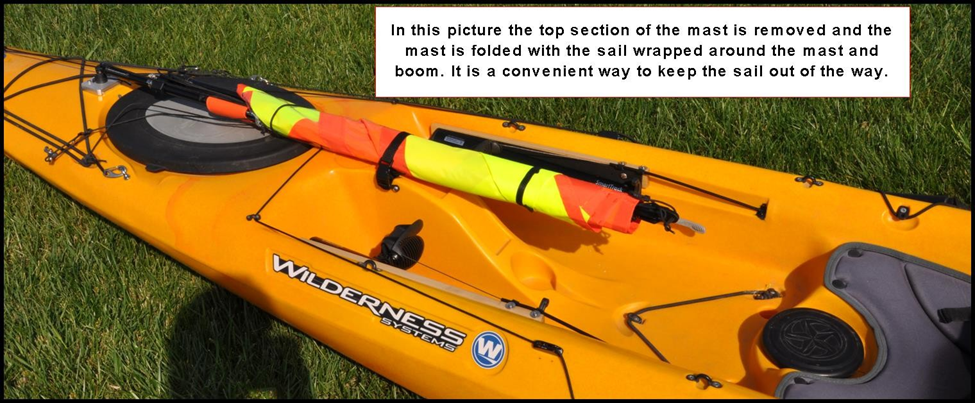
This works well on many sit on top kayaks. Typically compact stowage is not practical, for a sit inside kayak, because the mast joint cannot be reached while seated. The compact position is not very beneficial on longer boats anyway. When you are in your seat, determine if you can disassemble the mast before you decide to install a tie down kit for compact stowage. Keep in mind that the compact tie down method will put creases in your sail, which is something you may prefer to avoid.
If you cannot reach the sail well enough to compact fold the sail, it may still be handy to rig it for compact folding, as another storage option. For example, if you are confident there will be no wind, you may prefer to store the sail on the deck and have it completely out of the way and not use limited storage space inside your kayak.
Boom Vang Kit – Important read this
Do not use a boom vang until after you have successfully sailed a few times.
A boom vang is an optional line used to create downward force on the boom to keep the boom from rising and refine the shape of the sail.
It adds complexity and only helps after you have refined your technique.
If installed, the boom vang line must be released before you can fold the sail to get it out of the way. So when you are knocked over, and you need to recover (i.e. roll or get back in the boat after not rolling), or you simply want to stow the sail, not having a boom vang set will eliminate one mandatory step in the process.
Use it only after you have some sailing experience. Use it only if you notice there is a problem with the boom rising when you have the wind to your back. If you are a beginner, you will not even notice this until you get everything else under control.
Some paddle sailors are fine without a boom vang. You will only determine if you want a boom vang through use. In any case it is an optional feature. Many paddle sailors feel a boom vang is not necessary.
Basic install instructions are on the following pages.
If you have any questions call Falcon Sails at 419-800-0132, or send us an email info@falconsails.com. We are always glad to help.
Thanks again & have a great and safe time on the water!
Falcon Sails LLC
www.falconsails.com
Boom vang installation instructions
On a sit inside kayak all you have to do is install the cleat (& run the line of course) so you can set the boom vang.
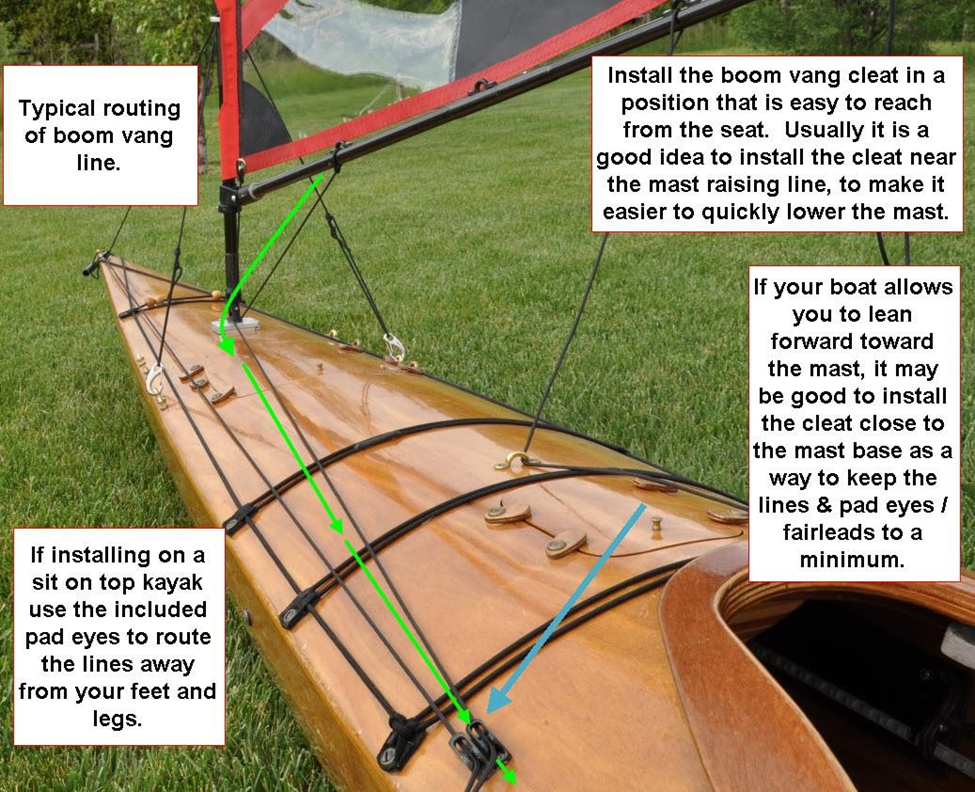
If you are installing the boom vang on a sit on top kayak or a canoe use the included pad eyes to route the line in such a way that the lines can’t get tangled with your feet, legs, foot pegs, or other hardware. See the below pictures of a typical installation of a boom vang.

This picture shows an overview of the routing of the boom vang line.
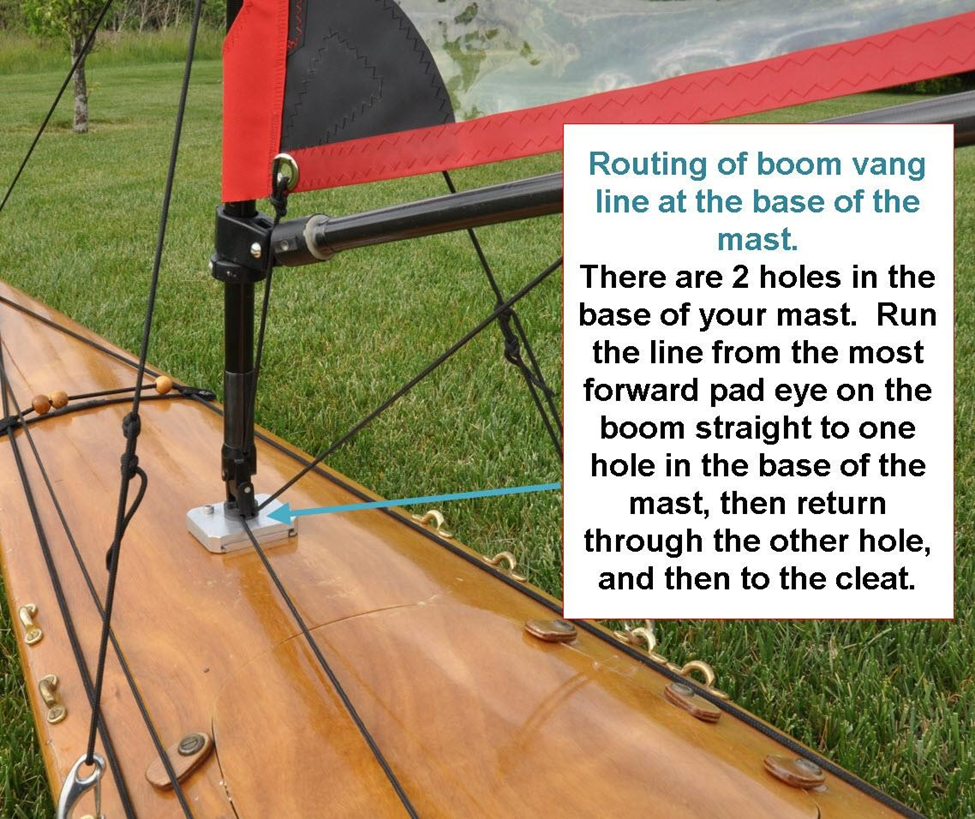
This picture shows the routing of the boom vang at the mast base. The line runs to the base of the mast so it can only pull the boom down. There are times when you want the boom to freely move left and right, but not up. The boom vang can provide downward force only. A sheet line ( the main boom control line) can not do this. With a boom vang you can prevent the boom from rising, and at the same time let the boom freely move left and right. The most obvious case where you would want downward force only on the boom, is when you are running with a hard wind at your back. Set the boom vang only when you see a obvious need for it, and you you are in complete control.
The best way to set the boom vang is to directly pull the boom down with your hand and then set the boom vang line in the cleat. Make sure the boom vang line is completely loose before you lower the mast. The best thing to do is loosen the boom vang long before you lower the mast. If you feel as if your ride is getting out of control, it’s a good idea to loosen the boom vang, as it will slightly depower your sail, and will put you one required step closer to securing your sail in the down position.
If you have any questions call Falcon Sails at 419-800-0132, or send us an email info@falconsails.com. We are always glad to help.
Thanks again & have a great and safe time on the water!
Falcon Sails LLC www.falconsails.com
Miscellaneous Notes
Boom details
The plastic pad eyes, and cleat should be on the up side of the boom.
Sometimes people mistakenly install their boom upside down and tie the lines directly to the pad eyes.
The pad eyes on the boom are not for tying lines directly to. The lines should be tied around the boom. The pad eyes are only there to prevent the line from sliding fore or aft on the boom. If you tie the lines to the pad eyes, you will put unnecessary stress on the boom and pad eyes. Make sure the pad eyes are up rather than down on your boom. If your boom is upside down, the routing of the sail outhaul line to the cleat is not as efficient or smooth as it could be.
When you tie your lines to the boom, tie the lines around the boom, at the pad eyes. Do not tie your lines directly to a pad eye.
Optional short boom configuration
You can cut your boom shorter 2.25” to increase your paddle stroke freedom. This is called the short boom configuration. If you have problems with your paddle stroke because you are hitting the tip of the boom, the short boom configuration can make a big difference. If you are hitting the middle of the boom with your paddle stroke, the short boom configuration will not do much good. The stock jam cleat configuration is easier to adjust, and does a slightly better job of holding the outhaul line but ends up being a little longer than absolutely necessary.
If you shorten your boom you will run the sail outhaul line directly to the end of the boom, and then to the jam cleat you remounted under the boom. The stock boom configuration has the jam cleat on top of the boom. With the stock configuration the outhaul line is routed directly to the jam cleat and then to the end of the boom. The short boom configuration makes the outhaul line a little harder to adjust because you have to pull the line forward, and it also does not hold the outhaul line as well because it is upside down and gravity is trying to pull the line out of the jam cleat rather than working to hold it in the jam cleat.
Forestay Bow Pulley
Ideally the forestay bow pulley should be as far forward on your boat as possible. The forestay bow pulley should also be as close to the boat as possible. Remove all the slack you can so there is not any unnecessary distance between the boat and pulley. And of course the pulley should also be attached to something that will not come loose.
If you are not confident about an existing tie down location there are a couple of options.
Option #1
If your boat does not have anything good to attach your bow block to, drill a hole from left to right about 1″ or less from the tip of your boat. That is an ideal tie down point. This area will provide the very best geometry for a solid standing mast. Most boats are solid material at this point, and your hole will not penetrate the inside of the boat.
If your boat is not solid at the area you drill, you may want to do the following things.
Drill your hole as small as possible so the line will pretty much fill the hole.
If you have penetrated the inside of your boat and are concerned about this, put some (marine sealant (3m 5200 is a good one), construction adhesive (liquid nails) or silicone) sealant on the line and hole so it is sealed. If you drill the hole small it may not be worth sealing. If you do use 5200, do it at a time when the boat can left untouched for several days because 5200 dries slowly. 5200 comes in a fast dry formula which is a little faster. An alternative is to use silicone, construction adhesive (like liquid nails), or any caulk. What material you use is not critical.
If you want to go over kill with it make an end pour in the bow of your kayak. If your boat is made out of a composite material, you can pour 3 or 4 oz of epoxy into the bow. If you have a plastic boat, construction adhesive (like liquid nails) is good. The warmer it is the better and faster your end pour will set up.
To do the end pour you will have lean your boat so the bow is down and the stern is up. Leaning your kayak against your house or a tree usually works pretty well.
If you use construction adhesive it is best to do it on a warm day, with the boat being warm, and the adhesive being warm so it flows and adheres as best as possible.
No matter what material you use it is a good idea to have a test portion of the end pour material on the side so you can have a good idea if it has dried / cured inside your boat before you put it down
Option #2
In the rare situation where there is no simple method of attaching the bow pulley, you can rivet a pad eye to your bow tip. If this is the best method for your boat, Falcon Sails will typically include a metal pad eye and rivets with your kit. If not, let Falcon Sails know and we can send you the necessary parts.
Allen wrench
The Allen wrench is for loosening the mast base set screw if it happens to be too tight to remove with your fingers. The set screw should only be finger tight.
Hang the sail when not in use
It is best to hang the sail when not in use, just like you would hang your clothes to keep wrinkles to a minimum. There is a grommet at the head of the sail where it will hang nicely on a nail.
Cut all excess lines
When done rigging your sail, cut all the lines to eliminate all unnecessary length. This will make your sail safer, lighter, less complicated, and make for a better appearance.
Install your hull reinforcement patch.
Your kit came with a hull reinforcement patch. It is approximately 6 inches around and has pressure sensitive adhesive on the back. You should install the mast on your deck, and then the mast compression strut on the inside of your boat next. Then use this to determine where to place the center of the hull reinforcement patch.
Mast and boom connectors
As you assemble your rig, you will see the mast consists of 3 sections of tube, and your boom is made of 2 sections of tube. These sections are connected together with 18mm tube connectors. One end is glued into 1 tube, and the other end will fit into the next tube. These tube connectors are designed to have no play between each section of tube. This is great for making all section of the mast and boom act as one solid unified piece & at the same time give you the benefits of a take apart rig. If these tubes are left together for extended periods of time, they can become difficult to take apart. This is especially true in a salt water environment. It is best to occasionally make sure these tubes are not fused together. You do this by simply grabbing each tube and make sure it can easily be
independently moved from the tube it is connected with. If they cannot easily be moved independently, you should pull the tubes apart, and clean the inside of the tubes and connectors with fresh water.
If your tubes are difficult to take a part, it is a good idea to sand the connectors with 120 to 300 grit wet dry sand paper to clean them up and or remove some diameter of the connector tubes. Non wet dry sand paper can be used, but it will clog up a little faster than wet dry sand paper.
If you are the type of person to leave things together for an extended period of time, you may want to consider sanding the connectors so they are a loose fit.
Some paddle sailors prefer some fittings to be loose fitting. This can be handy for a rigging situation where there is not a convenient place to stow the sail rig when it is down. In this case you may want to use compact-tie down position (for more info, see the sail tie down hardware instructions). In this case you remove the top section of the mast before stowing it on the deck so it can be folded more compactly. Many times in this rigging situation the paddle sailor will choose to sand the connector that holds the top section of the mast so it is loose fitting so it can easily be taken apart and not sand the bottom section so it will more likely stay in place.